Showing posts with label Dessert. Show all posts

Thursday, November 1, 2012

Halloween Marble Cake


My company had a baking competition today and I had to enter.  I decided to go with a marble cake as it has been a special request from one of my co-workers for a long time now!

I basically used a modified version of: http://allrecipes.com/recipe/chocolate-orange-marble-cake/


1 cup butter
1 1/4 cups white sugar
3 eggs
2 teaspoons vanilla extract
1 cup plain yogurt
1 3/4 cups all-purpose flour
3/4 teaspoon baking soda
3/4 teaspoon baking powder
1/4 teaspoon salt
2 tablespoons grated orange zest
3 tablespoons of cocoa powder
2 tablespoons orange extract
Orange and Black food colouring


First cream together the sugar and butter.  I was using special jelly like orange food colouring which should be worked in earlier.


Beat in the egg and yogurt, then carefully fold in the dry ingredients (flour, baking powder, baking soda, salt).  Usually recipes tell you to mix wet ingredients and dry ingredients in separate bowls and then fold them together.  I cheat but if you're not comfortable with baking cakes yet you should follow that method.


Divide the mixture in half and add the cocoa powder and black food colouring to one side, orange extract to the other side.
Carefully add the batter into a greased mold by spooning in a spoonful of each batter from both bowls.

It's tedious but keep working until you fill the mold.  Then swirl it a bit with a knife.

Bake at 350 F for 50 min.  Then let cool.
Flip it out on a cooling rack and spoon on a standard glaze.  (2 cups of icing sugar mixed in a couple of tablespoons of water).
It ended up pretty good!  The chocolate and orange flavours was subtle but there.  And I won first place at work!

Saturday, June 30, 2012

Chocolate Lava Cake


This week on Masterchef we saw 'Ryan' the big villan get kicked off.  I'm sure the show edited Ryan to be twice the jerk then he actually is but I got bought into the story they were selling and was happy to see him go.  The pressure test that sent Ryan home packing was the 'Chocolate Lava Cake'.  A Chocolate Lava cake is basically an undercooked brownie.  Nice and chocolate cakey on the outside, warm chocolate pudding in the middle.


I did this for the first time at a friends place so it was kinda like a pressure test.  I never got a chance to rehearse so it better come out great or I'll look bad!


Ingredients
4 Large Eggs
4 Large egg yolks
2.5 sticks of butter
6 tbs of sugar
7 ounces of dark chocolate
6 tbs of flour
8 tsp of cocoa powder
a pinch of salt
1/4 tsp of vanilla


In a bowl prepare the 4 eggs and add the 4 egg yolks
Add the sugar.  I have a little assistant to help me this time!

Beat the egg and sugar mixture until it becomes pale yellow in colour.  
In another bowl, melt the chocolate and butter together.  You can use a double boiler to melt the chocolate and butter but I just stick it in the microwave at a low (defrost) setting.  Mix together until smooth.
Mix together the melted butter/chocolate with the eggs.  If the chocolate is really hot then you'll might need to temper it.  But in my case the microwave only heated the chocolate just enough to melt and it wasn't too hot so I just dump it in.
Mix.
 Sift in the flour and coca powder.
The sifting is to help prevent lumps in the batter. 
Fold it all together gently.  Don't overmix.
Ladle the batter into buttered ramekin
Clean the edges of the ramekins if any batter got spilled on it.  Tap the ramekins on a hard surface to knock out any air bubbles and then place on a cookie sheet.
Cook in a preheated oven at 425 F for 13 min.  
After letting it cool for 10 min run a knife around the edge.
Pop it out on a plate. 
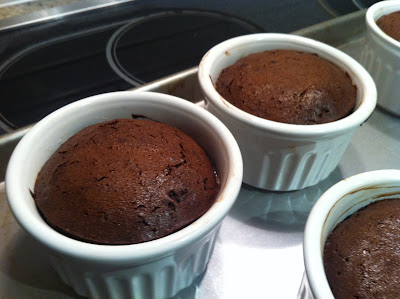
Dust with icing sugar and serve!  I don't know if the picture shows it well, but you should be able to see the 'lava' ooze out.  Maybe if I cooked it for 1 less minute it would be a little bit more runny.
My friends found the lava cake to be pretty rich tasting.  One thing I figured out while looking at the recipe again is that I put in 8 tablespoons of coca powder when the recipe called for 8 teaspoons.  That might have made the chocolate flavour too intense.  I would definitely recommend serving it with vanilla ice cream to help cut the richness.

Saturday, June 23, 2012

Home Made Apple Pie

I'm a big fan of the TV Show "Masterchef".  One of the thing I wanted to do last season was to personally try all the pressure tests the contestants had to go through.  I think most of the challenges are really interesting and learning them all should help me a lot in building up my culinary repertoire.  So now that season 3 has started I'm determined to follow through on my original plan.  However I'm not subjecting myself to the same time constraints and I get to do internet research so it's not quite the pressure test the contestants go through.  So this weeks pressure test was home made Apple Pie!  I've made my own pie crust for quiche so I felt this shouldn't go too bad.  There's a big discussion all over the internet on what apples are the best for making pie.  Tart apples like Granny Smith hold up their form really well while being baked while sweeter apples turn into applesauce.  I used a 1/2 and 1/2 mix of Granny Smith and Golden Delicious in this pie.

 Ingredients:

Pie Pastry
12 ounces of flour
2 sticks of butter
1/2 teaspoon of salt
8 teaspoons of ice water

Apple Filling
6 Apples (yes I know the picture has 8)
1 cup of sugar
3 Tablespoons of corn starch
1/2 tsp of cinnamon
1/8 teaspoon nutmeg

Measure out your 12 ounces of flour.  Flour compacts together so pastry recipes like to give flour measurements in weight instead of volume to be more precise.  Then throw in your salt.  I added a tablespoon of sugar just because Alton Brown says it helps brown the crust.
Throw everything into a food processor and blitz to mix everything.  This is the first time I used a food processor to make pastry - usually I use a pastry cutter.  I mentioned that I wish I had a food processor to make my pie dough to a friend of mine and he graciously lent me his!
Cut up your 2 sticks of butter into chunks and throw them in the freezer for a few min.  The whole secret to flakey pie crust is not letting the butter melt.
Dump your butter into the food processor and blitz for 1 second 12 times or until the butter is broken up into little bits like this.  If you don't have a food processor you can use a pastry cutter and just work the butter until it is this small.  The advantage of a food processor is that it does this super fast so the butter doesn't melt as much.
Add your ice water while mixing.  Don't over mix your dough or it would form gluten strands and become more bread like in texture.  Mix just enough that your dough is just starting to come together.  If you press some between your fingers it should stick together.
Dump it out on a floured work area and work it into a little ball.  I sprinkled a bit more ice water to help it along.
 Like this.
Split it into two portions and stick it in the fridge.

 Core, peel, and slice your apples.
Add your other filling ingredients and mix it together.  I decided instead of 1 cup of white sugar I did a 1/2 white 1/2 brown mix.  I also didn't measure out the cinnamon so I think there's a bit too much.  You're supposed to add the juice of 1/2 a lemon in the recipe but I forgot to buy one.
Flour your work area again and roll out one of the crust portions.  I had trouble with the edges as I couldn't keep a nice rounded edge.  So I made sure that I rolled it extra large so that all the nice pastry can fit in the 9" pie pan and the yucky edges can just be trimmed off.
Loosely roll it up on your rolling pin and then transfer it onto the pie pan.
Add your apples!  Your bowl of apples should have a lot of juices in it.  I've seen youtube videos where they will pour the juices back into the pie but I didn't want a watery filling so I omitted the leftover juices.  One thing I forgot to do was to dollop little bits of butter all over.
Roll on the top layer of pastry.  I kinda tore the top pastry a bit while lifting it off the work area.  But it ended up ok in the final product.
To seal the pie, go along the edges and fold the bottom layer pastry over the top of the top layer pastry, and then crimp with your fingers.
Give it an egg wash on top.  Just beat an egg and then brush it onto the pastry.  Sprinkle some sugar on top and cut some vents.
Cook in a 350 F oven for about 60 min, and your done!
 Yummy!


Monday, May 14, 2012

Carrot Cake

Hey guys I'm back!  It's been over a month since I last posted and it's mostly due to me cooking and eating the same types of food, mostly variations of braising different types of meat.  This past weekend though, a friend of mine asked if I can bring a carrot cake over to a dinner party so I thought I might as well blog it!

For each layer of the cake:

  • 4 eggs
  • 1 1/4 cups vegetable oil
  • 1 cup white sugar
  • 1 cup brown sugar
  • 2 teaspoons vanilla extract
  • 2 cups all-purpose flour
  • 2 teaspoons baking soda
  • 2 teaspoons baking powder
  • 1/2 teaspoon salt
  • 3 teaspoons ground cinnamon
  • 1 teaspoon nutmeg
  • 3 cups grated carrots
  • 1 cup chopped walnuts


First combine together the eggs, oil, sugar, and vanilla

Should look like this when it's all mixed together.  If your brown sugar has clumps you should work the clumps out


Dump in the flour, baking soda, baking powder, salt, cinnamon and nutmeg


Fold in the dry ingredients.  The trick is to fold in the dry ingredients just enough that it's thoroughly mixed in.  If you work it too much you'll develop gluten strands and have a tougher cake.  I like to use a wire whisk to just work the dry ingredients and then fold it into the rest of the batter with a rubber spatula.

Dump in the carrots


Add the walnuts and fold it all together.
Pour into your buttered, 8 inch springform pan.

Here it is 350 F for about 75 min.  Each oven is a bit different so use a toothpick and test the centre of the cake to make sure it comes out dry.  The original recipe says to cook for 40-50 min but it wasn't near done for me at that point.
Let it cool for about 30 min. and then take it out of the pan.

Cut off the muffin top so you'll have the flat surface on top.  If you're really OCD you can measure all around the cake and mark the height with toothpicks so when you shave the top off it'll be level.  But I just eyeballed it and it looks ok to me.


Now the icing!  Mix together 1 block of cream cheese, 1/2 block of butter, 1 teaspoon of vanilla, and 3 cups of icing sugar.
After the cake is nice and cool, smear it on top.  Give it a nice thick layer.


Slap on that second layer.  You did bake a second layer didn't you?


Here's 1 layer of icing done.  You can see it's sitting on a lazy susan made for cakes.  It helps that you can spin the cake while icing it.  I put it in a fridge to firm up a bit and put on a 2nd layer.  I ended up making another batch of icing but it actually was too much.  Next time I'll probably try multiplying the original amount by 1.5 and it should be just right.

I couldn't get the brown cake not to show through the white icing on the side so I hid it by putting on a some chopped walnuts on the side of the cake.  Here's the finished product!


Yum!  I got a bunch of compliments.  Hopefully they were being truthful!


To give credit to the origonal recipie: I got it here: allrecipes.com